For the general environment of my space level it is clearly an important issue for there to be a number of asteroids to make up the general scenery.
A rather quick technique of mass-producing these is done by utilising 3dsMax's modifiers.
As can be seen in the first image below, by starting with something as simple as a sphere with a standard 32 segments applied generates a model with <1k polys. (960 to be exact).
With the application of a 'Noise' modifier as seen below and the use of a unique seed on the model, it creates a fairly convincing base asteroid for use in my game.
And by creating copys of the original asteroid model and then by going through and giving each asteroid its own unique noise modifier seed, we now have a collection of unique-looking asteroid models that can be taken from 3dsMax and processed into zBrush to obtain a good set of UV co-ordinates, then to MudBox to generate the Noise and Vertical Displacement Maps, then its a case of texturing and finally getting them into UDK as part of the level!
Finally with a bit of scaling on each asteroid, there is now a collection of vastly different asteroids for me to populate my level with. The intention is for these "big" asteroids to make up a significant portion of the level and then by scaling down within UDK I can litter them around.
Just a quick update on my in-game HUD. As can be seen below is the Health Bar and Ammo Bar.
Its made in Flash Pro CS 5.5 (Actionscript 2.0). I've got an animated reticle, health bar and an ammo counter that when implemented into my game in UDK should react dynamically according to the values of the player ship.
Above you can see them in the Scaleform Launcher test, all showing correctly and while it cannot be seen here, they are animated. Now it is justa case of implementing it into UDK and placing it correctly in the lower right corner of the screen. The reticle has a slow clockwise rotation on it as well that looks quite swish so I am excited to get this implemented as soon as possible!
Here you can see the skeletal mesh that encompasses my Player Ship.
It's an evolution on the last testing rig I made for the previous flight test.
This time it takes into account the turrets, foot and wings at the back.
Below is a picture of the rig inside the Player Ship:
I took a much more comfortable root in the rigging/bone weighting method utilising an amazing piece of MEL script for Maya that allows you to allocate weighting in a manner exact to 3dsMax.
I was having a great deal of issues getting used to bone weighting using the 'Paint Weights Tool' / Component View, so after some digging around on the net, I found this very useful script!
Also when dealing with
non-organic stuff where it's just needed to weight all of sections to 1 and the model has verts that crossover in places, it is a pain in the ass to swing around
your model looking for all the verts to select.
The method I took was of simply selecting the faces for the verts I wanted then
(making sure I'm in polygon mode) > Select > Convert Selection
> Vertices! (Hours saved!).
Then it was just a case of applying the appropriate weighting to the appropriate bones!
Guess theres no more... *put on sunglasses* Weight-ing around!
Okay so now I've had a fantastically refreshing sleep, it's back to getting this blog updated to where I'm currently at, and so we continue on with the Skybox Creation and the steps taken to achieve it.
To the left here is the general camera settings and below are the render settings.
Note that each render will be a 4k Square map, this is to preserve the highest quality as I'm going between programs and any scaling for optimisation of file size will be done once the cubic map is finished.
Below you can see the render settings I have used. No cameras are currently selected as per each render this has to be changed.
Below you can see the positioning of the cameras within the scene.
With the above settings all finalised I can render out the 6 images I will be taking with me into SkyPaint to produce my 360-degrees seamless panoramic skybox.
Render #1 (Galaxy_FT):
Render #2 (Galaxy_UP):
Render #3 (Galaxy_BK):
Render #4 (Galaxy_DN):
Render #5 (Galaxy_LF):
Render #6 (Galaxy_RT):
With the above renders complete, I can now take them into the program of SkyPaint and create my seamless skybox for the level.
In the very early stages of this project I mentioned my intention to make use of the Render Paint Effects tool that is contained within Maya to help me create a highly detailed skybox that would encompass the level for my game.
I started producing this utilising the galaxy brush located in the Get Brush menu for that tool.
With the tool selected I created what would be the base spline from which the post-processed star/galaxy fields would be generated and then after tweaking the tool settings to a point at which I believed them to be at an aesthetic setting. The picture below shows what I eventually achieved after a great deal of tweaking.
With the above settled, I began the task of duplicating and tactically positioning around the World Co-Ordinate 0 to create a spherical layout. This began simply by initially creating a bowl shape on one side, then grouping and rotating around World0 to make sure a similar distance is kept.
Each paint effects spline has a random seed applied to it so every single spline (while the same base shape) emits a completely different set of post-processing particles creating a truly unique space environment.
Above you can see the skybox from outside of it's intended view, this at approximately 45% completion. I further tweaked this tidy up alot of the spline placement and then also played around with many of the splines distance from where the camera rendering out the panaromic shots would be to create a stronger illusion of depth.
After finishing up to the 50% mark I then grouped and rotated the Paint Effects to encompass the entire area around World0 as can be seen in the picture below. Further below that picture is a rendering of what that entire area looks like.
Below is the visible setup from within the Maya viewpoer and then further below is a rendering from inside the skybox (at World0). It was imperative to make sure that none of the lines truly overlapped and as a consequence cause a great deal of inconsistency in the skybox.
Now that the skybox base has been complete I can get a render produced at the 6 standard angles(each camera set specifically to 90degrees Field-of-View). Then using a program called Skypaint and it's pipeline into Adobe Photoshop via plug-in, I can stitch together a very high quality skybox for my game.
Before the next phase I decided to render out a video using the camera at World0 to scan around the skybox with the intention of checking for holes/patches, this way I had something tangible with which to brainstorm about.
Be Warned:
The camera in the following video has a FOV set to 90, this may cause motion sickness in some people due to the fast paced nature of the object. However by stopping and starting the video at different intervals you can get a really good feel for the stars surrounding the level.
It is my intention that once the final panoramic is complete that I will try to make use a great deal of NASA stock footage to add nebulae's, auroras, gas giant clouds, basically all the things that makes space so wonderous and exciting! :)
So after getting quite comfortable in the operation of Mudbox, I decided to try my hand at making some example asteroids. These are two potential environments I am considering.
I think it would be alot easier to produce your standard asteroid field much like the example that is on the left in the picture.
However I think if I could get a setup whereby the majority of the environment is in the style of Ice/Crystals (like the example on the right), that could look really incredible, however I might save that as a low-priority cosmetic change to consider when the next big deadline is out the way.
So for now I am resolute in the knowledge it can be done and how to do it but it's something
that to execute correctly I will have to set aside a good deal of time.
I will be aiming for the general environment to reflect the typical 'Rock-Asteroid' scene as it is the one at this stage that will not just be the most efficient but also the most effective in building a scene which conveys verisimilitude.
I did encounter some paticular issues when I brought the Vector Displacement
and Normal Maps over to Maya for a test render as can be seen below.
I hadnt resolved this at the time but I imagine it was due to the lack of a proper texture
on the model which cause the artifacts to look much more prominent and unwholesome
than they actually would be when combined with what's missing.
In a sense it's the opposite effect to what I experienced when looking at my textured
Player Ship without its VD/NM's applied.
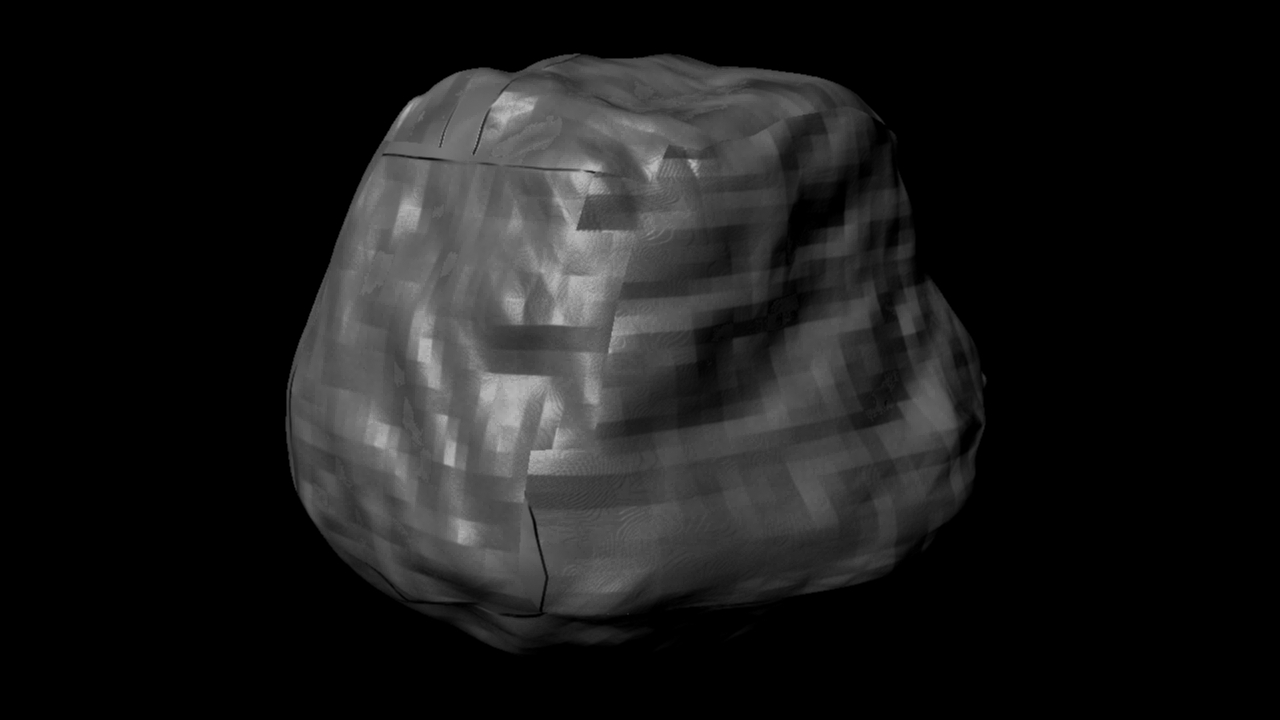
Below is the asteroid you see in the Mudbox window above, except at its lowest Subdivision
with the Vector Displacement Map applied in Maya.
And below is both the Vector Displacement and Normal Map applied, however I believe a potential UV Mapping issue is what's causing the seam issues which can be seen on this side of the rock.
It may have been an error caused by myself during the sculpting of the object.
I am hopeful a fresh build of some asteroids will not encounter this issue again.
An established system of workflow generally leads to smooth sailing,
so this is just a note as to how I am going about operating between the various stages
of game asset creation and will serve as a future reference to ensure that in the
dreaded event of data loss, I can be sure to restore backups without a hitch,
on the same software versions and builds.
Autodesk Mudbox allows for a much similar operation when working with 3D Models and Textures like ZBrush. I personally found Mudbox to be much more user friendly in that upon initial startup, you can specify a paticular layout with hotkeys similar to what program you are most familliar with. This is especially useful as there is an option to choose a 'Maya-style' layout, saving considerably on confusion and making workflow between both programs much more flush and elegant.
Below you can see how I have approached sculpting the details onto the 3D model.
In the picture below it can be seen that the model is smoothed, while the base model is not. This method of adding multiple subdivisions to a simple object (and thereby turning it into quite a complex object) allows for a tremendous amount of detail to be added to the 3D model.
Mudbox does not just offer sculpting though, with full integration with Maya and a very easy transition pipeline for getting layers and information from Photoshop, this program really does offer a true all round solution, and it is one that I have found myself to be very comfortable in using.
Note the detail added above. Once this had been achieved covering the entire model as to how I desired it, it then became necessary to produce the maps that would add the finishing touches to the Player Ship's presentation within the game world.
Below you will be able to see, firstly the Normal map then followed by the Vector Displacement Map. These are generated in Mudbox according to the sculpting deformations that you make when working with a much higher subdivided version of the model itself. The imperative nature of creating well made UV maps is key to success here as the additional subdivides sit snugly within the original UV Map boundaries and this way do not intersect/interact in a negative way upon the vertex's surrounding them.
"Player Ship - Normal Map"
"Player Ship - Vector Displacement Map"
These final renders below were created utilising all the previous levels of production in creating this ship and its texture in a combined method. These high-quality renders should now correctly identify the end of a journey in terms of from initial concept to production finalised.
Some textures do still need to be adjusted however these are simply cosmetic issues that can be fixed during a later phase of development. For now the bulk of the leg work is done on the Player Ship and it is ready for Rigging and Animation then finally it will be implemented with the code that was finalised on the Test Ship in the very early days of this games development cycle.
Making use of the plethora of textures I chose during the selection process, I cut, shaped, and modified until the desired effect was achieved over the UV Map with my Player Ship texture.
I used a range of techniques in getting the textures to align with the polygons and in trying to build this impression of plated metal over the ship.
As it stands at this point the model's texture seems very bare, the next stage will be the production of Vertical Displacement Map and a Normal Map. It is with these maps that the final touch will be achieved in the visual aspect of the Players Ship.
By applying the texture you can see above, the texture fits snugly over the model (below) and while the blending options for the shadows around the plates seem quite overbearing at this stage, I am confident that when the additional maps are applied they will coalesce and produce a result that I can be pleased with.
Taking the UV Map that was produced as specified in the previous post I moved forward into gathering a collection of samples that would best dictate the intended look for my Player Ship. In my concepts for this ship I tried to experiment with scratched/damaged detailing over a cool-silver exterior hull. It was then when I began to play around with that colour scheme I realised it didn't truly fit the form that I had visualised during my conceptual stages. I wanted something that reflected a darker and more gritty semblance to humanity within my game.
To take two extreme examples, below you can see a picture of the Defiant from Star Trek:First Contact. Note how the ship is very clean in design and this is a theme that is prevalent across all the designs in Star Trek. Further below is a picture of the Battlestar Galactica from the remake-series that goes by the same name. In BSG humanity is on the run and the ships are very far from being fresh off the manufacturing line.
The design aspect I wanted to be closer to within my game for all the
ships/stations falls closer to that of the dark gritty nature exhibited within the BSG series.
I want it to be evident to the player that space-travel is not just an everyday occurence, but it has been in use for so long that there is a majority of ships in states of disrepair.
Here are the final texture selections I made that compose
the general look and feel for my finished ship texture:
"Ship Hull"
"Metal Grate"
"Metal Diamond"
"Warning Hazard"
"Frosted Glass"
(Subject to change)
These are some additional textures I made by sampling the Ship Hull texture to further create a range of differing patterns across the Player Ship.
This was done a multitude of time in many different ways, here are two examples that should highlight the way in which I approached taking the visual data from the base texture and then modifying it to remove visual artificats that would 'clue' the viewer in to the fact it is a modified version of the texture making up the majority of the ship.
"Ship Hull 1"
"Ship Hull 2"
Coming next is a breakdown of the texturing process onto the UV Maps...
At this stage in my workflow, with my player ship model complete.
I exported the Player Ship as an .obj file and then imported it into Zbrush 4.0.
The purpose of doing this is that Zbrush has a rather nifty plugin that allows meshes (from simple to complex) to be automatically unwrapped in a tangible and understable manner.
This plugin is called UV-Master can be obtained from here.
Simply place the plugin with ZBrush's plugin folder contained within the installation folder.
The fruits of such labour can be seen below.
The below UV map allows for consistent application of accurate textures onto the 3D model.
This will prove to be especially useful in creating aestheticly pleasing textures that will allow further development when considering the application of vertical displacement maps and normal maps.
The UV Master plugin allows the user to 'paint' areas that require to be preserved and allow a quick and easy function for the user to also 'paint' where the seams will exist on the UV map for the model. This aspect of ZBrush really astounded me in how it cut many hours out of the workflow for this section and allowed a much faster transition between the production stages.
Now this is where I encountered a multitude of problems within ZBrush.
For some reason I just could not get to grips with the general functions of the program and found the HCI aspect of using the program to be quite encumbersome at times.
In terms of the quality of results when sculpting within ZBrush I was very impressed however its operation on an interaction level began to really grate me after a while and that is when I began to look into an alternative approach to producing my vertical displacement/normal maps.


